Dry Construction Underfloor Heating for Timber Floors and Upper Levels
Introduction
In the Netherlands, where compact living and energy efficiency are paramount, retrofitting heating systems without major structural alterations is a constant challenge. Thousands of homes—especially those built between the 1930s and 1970s—feature timber joist upper floors that simply cannot bear the weight of a traditional wet screed. This is where dry construction underfloor heating becomes a game-changer. It offers a lightweight, shallow, and highly responsive heating solution ideal for timber floors and upper levels, enabling a comfortable and modern upgrade without compromising the character of your Dutch home.
Whether you are renovating a classic Amsterdam apartment, extending a 1930s terraced house, or converting an attic into a liveable space, dry floor heating provides a practical path to even warmth. This article dives deep into the world of dry systems, explaining the technology, comparing options, and giving you the practical knowledge to make an informed renovation decision.
Basic Concepts: What Is Dry Construction Underfloor Heating?
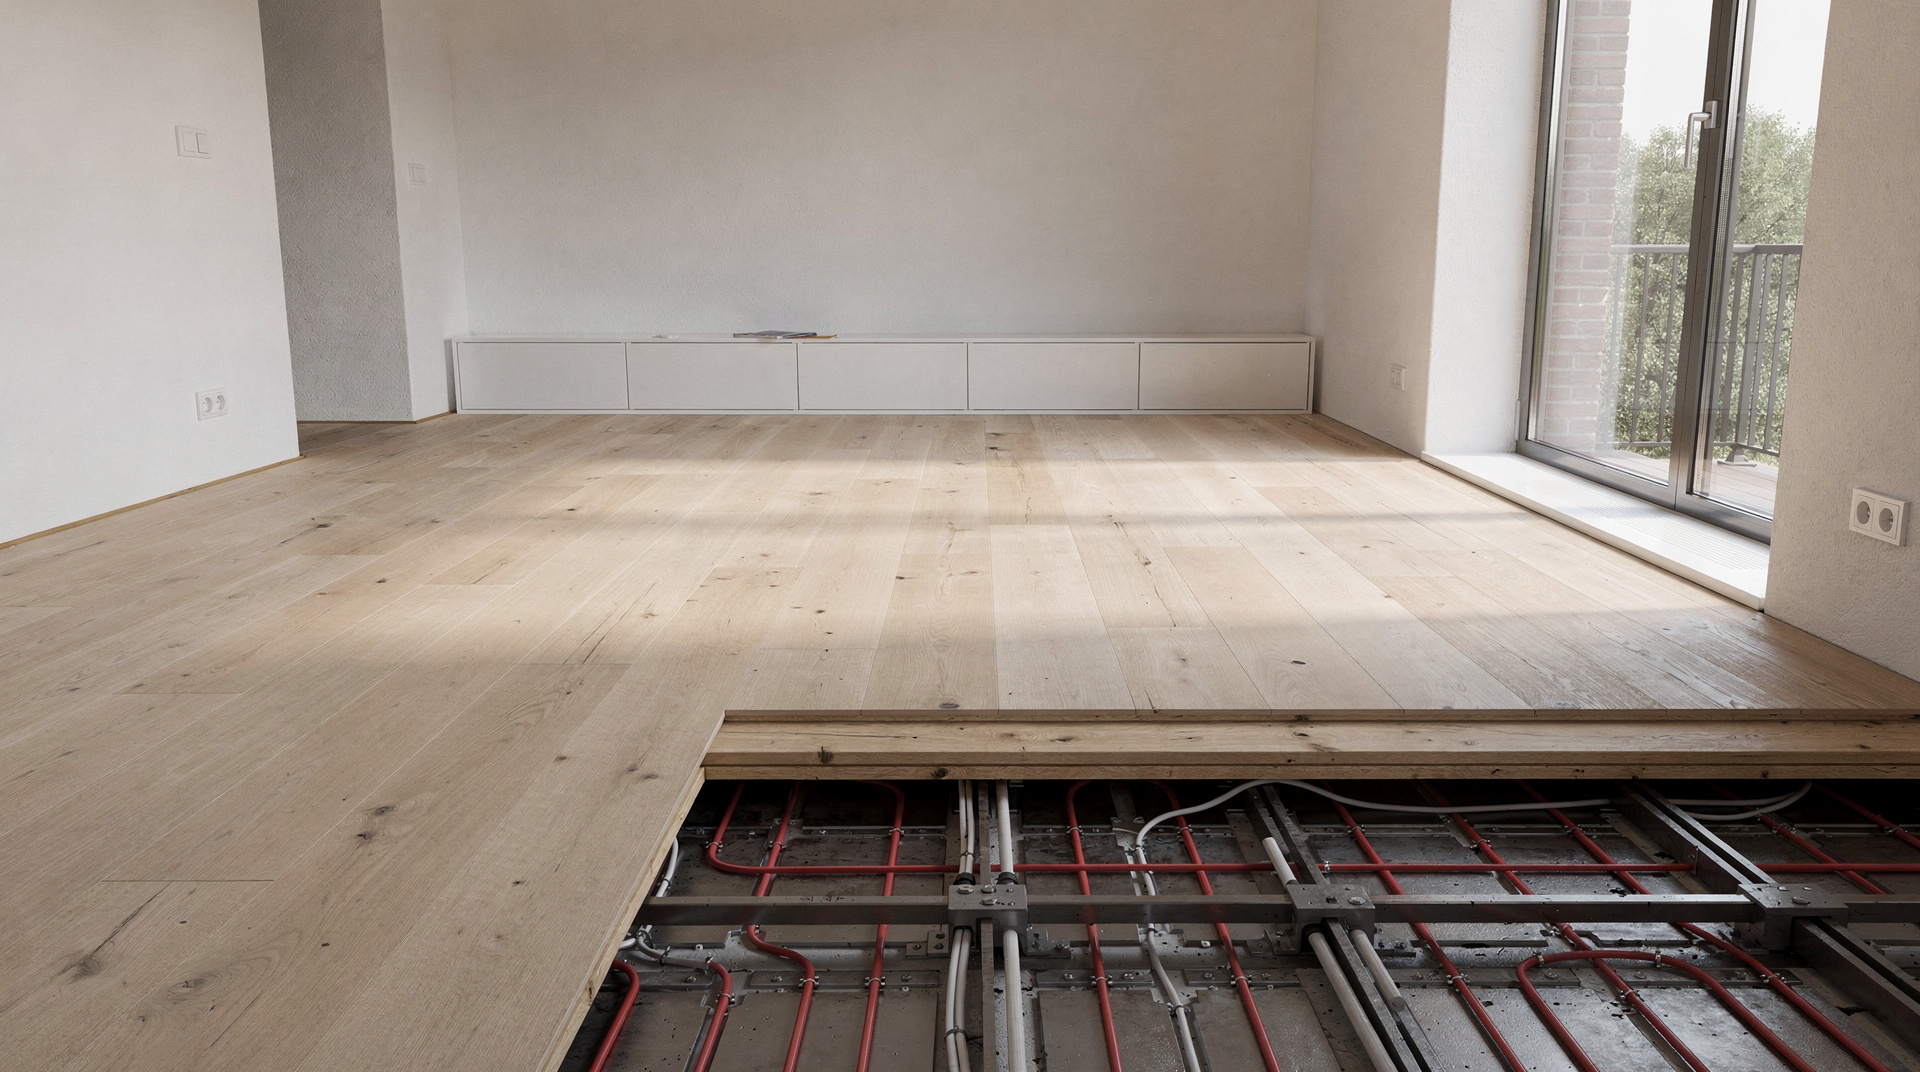
Unlike traditional “wet” underfloor heating—where pipes are embedded in a thick layer of sand-cement screed—dry systems involve no wet trades. The heating elements (electric cables, mats, or thin water pipes) are integrated into prefabricated insulation panels or modular boards that are installed directly over the existing subfloor or between joists. The floor finish (laminate, engineered wood, tiles, or even carpet with suitable underlay) is then laid directly on top.
- Dry electric systems: Heating cables or carbon film mats are rolled out and connected. They are exceptionally thin (often under 3 mm), making them perfect for retrofit projects where door thresholds and stair heights are critical.
- Dry hydronic (water-based) systems: Slim panels with pre-routed channels for 10–12 mm PEX pipe are laid as a floating floor or fixed to the subfloor. A central heating boiler or heat pump circulates warm water. This option is more efficient for whole-house heating when connected to a low-temperature source.
- Modular climate floors: Some advanced panels combine high-density insulation, a heat-spreading aluminium layer, and a pipe groove in one lightweight board, reducing installation time dramatically.
The absence of screed means the floor build-up height can be as little as 15–30 mm, a crucial advantage when renovating upper floors where structural load limits and ceiling heights are non-negotiable.
Why Choose Dry Underfloor Heating for Timber Floors?
Timber joist floors present a unique set of requirements. Traditional screed weighs approximately 100 kg/m² at a thickness of 50 mm, far exceeding the load capacity of most Dutch residential upper floors designed for about 150–200 kg/m² total (including furniture and people). A dry solution weighs a fraction of that—hydronic panels with insulation typically reach 20–25 kg/m², while electric mats are even lighter. This weight saving eliminates the need for costly structural reinforcement.
Timber also expands and contracts with changes in temperature and humidity. A flexible dry system can accommodate this movement better than a rigid screed, greatly reducing the risk of cracking. Moreover, installing dry heating directly onto the existing timber boards (provided they are level and structurally sound) preserves the original floor structure, which is often a key consideration in Dutch monumental buildings where regulations protect original materials.
System Options: Electric vs. Water-Based Dry Systems
Selecting the right system for your Dutch renovation depends on the size of the area, the existing heat source, and your long-term energy goals. Below is a detailed comparison to guide your choice.
| Feature | Electric Mats / Film | Dry Hydronic Panels |
|---|---|---|
| Typical thickness | 2–3 mm (mats) / 0.4 mm (foil) | 15–30 mm (panels with insulation) |
| Weight per m² | ± 0.5–1.5 kg | 20–25 kg (fully installed) |
| Heat output (max) | 100–160 W/m² | 40–70 W/m² (perfect for low‑temperature heating) |
| Response time | 10–30 minutes (very fast) | 30–60 minutes (slower due to water mass) |
| Operating cost | Higher (electricity per kWh is expensive in NL) | Lower when coupled with a heat pump or high‑efficiency boiler |
| Installation complexity | Simple, DIY-friendly (except electrical connection) | Requires professional pipe laying and manifold connection |
| Ideal application | Single rooms, bathrooms, attic conversions, spot heating | Whole-floor renovation, new extensions, or when replacing a central heating system |
| Compatibility with Dutch LTV (low‑temperature) sources | Not applicable | Excellent; designed for 35–45 °C flow temperatures |
For a typical Dutch upper‑floor renovation, electric systems are often chosen for their minimal build‑up and easy retrofitting in rooms under 20 m². However, with the Netherlands moving toward gas‑free heating (aardgasvrij), an electric-only approach could become extremely expensive. A dry hydronic system connected to a heat pump offers a future‑proof, sustainable solution if your budget and technical setup allow the slightly thicker floor construction.
Installation on Upper Levels: Challenges and Solutions
When installing dry underfloor heating on an upper floor of a Dutch house, you encounter several technical challenges that must be addressed methodically.
1. Structural Assessment and Load Capacity
Before any work begins, commission a structural engineer to calculate the exact load-bearing capacity of your timber joists. This is vital in homes built before the 1970s, as joist dimensions and spans were often optimised for minimal material. A dry hydronic system with 20 mm cement‑bonded particleboard panels adds about 25 kg/m². Compare this to the 80–100 kg/m² of a traditional screed, and the advantage becomes clear. Even so, you must never exceed the permissible floor load. Strengthen joists with additional timber sisters or steel flitch plates if the existing capacity is inadequate.
2. Acoustic and Thermal Insulation
Dutch building regulations (Bouwbesluit 2012, soon to be Besluit bouwwerken leefomgeving) demand strict sound insulation between dwelling units and within a single-family home. Upper timber floors often transmit contact sound (contactgeluid) excessively. Installing a dry heating system gives you the opportunity to incorporate high‑performance acoustic insulation between the joists. Use mineral wool (minimum 100 mm, density ≥ 30 kg/m³) or specialist acoustic batts. Then lay a resilient layer—such as a thin foam or rubber mat—before the heating panels to dampen impact noise. This combination can significantly improve the contact‑sound index (Ico) and help you meet the required ≤ 54 dB for contact sound in existing buildings.
From a thermal perspective, insulation below the heating elements is mandatory. Place rigid insulation boards (PIR or EPS) directly under the dry panels or between the joists to achieve an Rc value of at least 3.5 m²K/W, as required for heated floors adjacent to unheated spaces (like a cellar or a neighbour’s ceiling). In practice, 80–100 mm of PIR delivers Rc ≈ 3.5–4.0, minimising downward heat loss and forcing the warmth upward into your living space.
3. Levelling the Subfloor
Timber floors can be uneven. An uneven subfloor will cause the heating panels to rock, creating air gaps that reduce performance and can lead to noisy floors. Before installation, check the level with a long straight edge. If deviations exceed 3 mm per metre, apply a self-levelling compound suitable for timber (fibre-reinforced, low‑weight) or fix a layer of plywood of appropriate thickness to create a flat, stable base. Skipping this step is one of the most common causes of dry heating system failure.
Step-by-Step Installation Guide for Dry Hydronic Panels
Use this checklist as a practical roadmap for your renovation. Always follow the manufacturer’s specific instructions and hire a certified installer for the hydraulic and electrical connections.
- Empty the room and remove all floor coverings. Inspect the timber joists for rot or woodworm, replacing any damaged sections.
- Install acoustic/thermal insulation between the joists. Ensure a snug fit without compressing the material. Lay a vapour-control layer (PE-foil) over the insulation if there is a risk of moisture ingress from below.
- Prepare the subfloor. If the existing boards are in good condition and level, you can proceed. Otherwise, screw down a 15–18 mm plywood layer to create a uniform surface. Seal any gaps with flexible filler.
- Unroll a 5 mm thick resilient acoustic mat over the entire floor. Tape the seams to prevent sound bridging.
- Lay the dry construction panels. These are often interlocking gypsum‑fibre or cement‑bonded boards with pre‑milled pipe channels. Start from one corner and stagger the joints. Leave a 5–10 mm expansion gap around the perimeter.
- Run the pipe. Starting from the manifold, press the 12 mm PEX‑AL‑PEX pipe into the panel channels according to the designed loop pattern. Use a pipe uncoiler to avoid kinks. The loops should be equally spaced (typically 100–150 mm centres for low‑temperature heating).
- Pressure test the circuit with air or water at 1.5 times the working pressure for at least 2 hours before closing the floor.
- Install a heat‑spreading layer. Some systems require an aluminium overlay or a thin levelling compound. Follow the panel manufacturer’s guidance precisely.
- Lay the final floor finish. Engineered wood, laminate, or tiles on a decoupling membrane all work well. Maintain the perimeter expansion gap and use a suitable underlay if needed.
- Connect the manifold to the heat source and commission the system according to the Dutch ISSO guidelines for low‑temperature heating.
Electric system installation follows a similar but simpler logic. After insulating the subfloor, you roll out the heating mat, connect the cold lead to a dedicated thermostat sensor, test the electrical continuity, and cover the mat with a thin flexible levelling compound or directly under the floating floor. A certified electrician must perform the final connection and sign off on the installation in accordance with the NEN 1010 standard.
Cost and Efficiency: A Comparative Table
Understanding the full investment required helps you balance upfront costs with long‑term energy savings. The table below shows estimated costs for a 30 m² upper‑floor renovation in the Netherlands, including materials and professional labour (prices as of 2025, excl. BTW).
| System | Material cost (€/m²) | Labour & auxiliaries (€) | Total project estimate (30 m²) | Annual heating cost* (€) | CO₂ savings vs radiators |
|---|---|---|---|---|---|
| Electric mat (e.g. 150 W/m²) | 50–80 | 600–900 (electrical work, levelling) | €2,100–3,300 | €720–960 (electricity) | 0–10% (depending on green electricity source) |
| Dry hydronic with heat pump (LTV) | 70–100 (panels + pipes) | 1,200–1,800 (manifold, insulation, installer) | €3,300–4,800 | €320–440 (heat pump) | 40–50% compared to a gas boiler with radiators |
| Dry hydronic with HR‑ketel (gas) | 65–90 | 1,100–1,600 | €3,050–4,300 | €480–600 (gas) | 15–25% (lower flow temperature improves condensing) |
| *Annual heating cost based on a well‑insulated 30 m² upper room, heating season of 2000 degree‑days, energy prices of €0.40/kWh electricity, €1.10/m³ gas, and a heat pump SCOP of 4.0. Actual costs may vary. | |||||
The data clearly shows that while a dry hydronic system requires a larger upfront investment, its running costs are substantially lower—especially when paired with a heat pump, which aligns with the Dutch government’s ambition to phase out natural gas by 2050. For a single room or an occasional-use attic, an electric system might still be the preferred option due to its simplicity and minimal build‑up height.
Dutch Regulations and Considerations
Any heating installation in the Netherlands must comply with the Bouwbesluit 2012 (and from 1 January 2024, the Omgevingswet and Besluit bouwwerken leefomgeving). Key points for your upper‑floor dry underfloor heating project include:
- Energy performance (BENG / NTA 8800): If your renovation includes a new extension or a major renovation of the building envelope, the entire dwelling must meet the nearly energy‑neutral (BENG) standards. Underfloor heating, particularly low‑temperature hydronic, improves the BENG 3 score (energy use) and is therefore encouraged.
- Ventilation: Installing a new floor heating system does not alter ventilation requirements, but be careful not to block air vents in older homes. Wet appliances below the floor (like a new manifold) may require additional ventilation.
- Subsidy opportunities: The Dutch government’s Investeringssubsidie duurzame energie en energiebesparing (ISDE) offers subsidies for heat pumps and for measures that improve a home’s energy label. While the dry heating panels themselves are not directly subsidised, combining them with a heat pump and insulation may qualify for the total package.
- Monumentenwet: If your property is a listed monument (Rijksmonument or gemeentelijk monument), always consult the local monument commission before altering original timber floors. Dry systems are often permitted because they are reversible and do not irreversibly damage the historic fabric, unlike a concrete screed.
- Neighbour consent (VvE): In apartment buildings with an Owners’ Association (VvE), structural changes and modifications that could affect sound insulation require approval. Present the acoustic improvement plan alongside your heating proposal to secure a positive vote.
Practical Tips for a Successful Retrofit
Following these best practices will save you time, money, and frustration during your renovation.
- Always verify the joist condition and load capacity first. Never assume an old timber floor can support even a lightweight heating system without inspection.
- Combine heating with acoustic upgrade. Treat the project as an opportunity to solve two problems at once—contact noise and comfort heating—by integrating high‑density mineral wool and a resilient layer.
- Plan for the manifold location. For hydronic systems, the manifold must be placed in a central, accessible location. A cupboard on the upper landing or in a bedroom wall works well. Allow enough space for future maintenance.
- Use a low‑temperature design flow. Design your loop spacing to achieve a water temperature no higher than 45 °C. This ensures the condensing boiler or heat pump operates at its peak efficiency. Use design software (such as validated tools conforming to ISSO 51) to calculate the exact spacing for your floor covering.
- Install a separate zoning thermostat. Upper floors often have a different heat demand than the ground floor. Fit a programmable thermostat with a floor sensor to prevent overheating the timber surface (limit to 27 °C for wood).
- Document every step. Take photos of pipe loops, insulation layers, and manifold connections before closing the floor. This documentation is invaluable for any future modifications and confirms compliance for your home insurance.
Conclusion
Dry construction underfloor heating represents a smart, adaptable solution for bringing modern comfort to timber floors and upper levels in Dutch homes. By eliminating the need for heavy screed, it respects the structural limits of older buildings while delivering even, efficient warmth. Whether you opt for the ultra‑thin convenience of electric mats in a small attic room or invest in a future‑proof hydronic system connected to your heat pump, the key lies in meticulous planning: respect the load‑bearing capacity, integrate acoustic and thermal insulation, and always align your installation with the latest Dutch building regulations.
As the Netherlands accelerates toward a gas‑free built environment, retrofitting upper floors with low‑temperature dry underfloor heating is not merely a comfort upgrade—it is a long‑term investment in the sustainability and value of your property. Approach the project with the thoroughness that Dutch craftsmanship demands, and you will enjoy silent, responsive warmth under your feet for decades to come.