Milling vs Build-Up Underfloor Heating in Existing Concrete Floors
For Dutch homeowners planning a major renovation, replacing high-temperature radiators with low-temperature underfloor heating is no longer a luxury but a strategic necessity. With the national phase-out of natural gas and the rise in heat pump installations, the question is no longer if you should retrofit underfloor heating into your existing concrete floor, but how. There are two techniques: milling (infrezen) grooves directly into the structural slab, or installing a build-up (opbouw) system on top of it. The choice affects your renovation timeline, floor height, thermal performance, and budget. This article examines both methods so you can make an informed choice.
Understanding the Two Retrofit Approaches
Before a single pipe is laid, it’s essential to grasp what these terms mean in the context of a Dutch home. Both systems circulate warm water through pipes embedded in or on the floor, but their interaction with the existing construction is radically different.
What is Milling Underfloor Heating (Infrezen)?
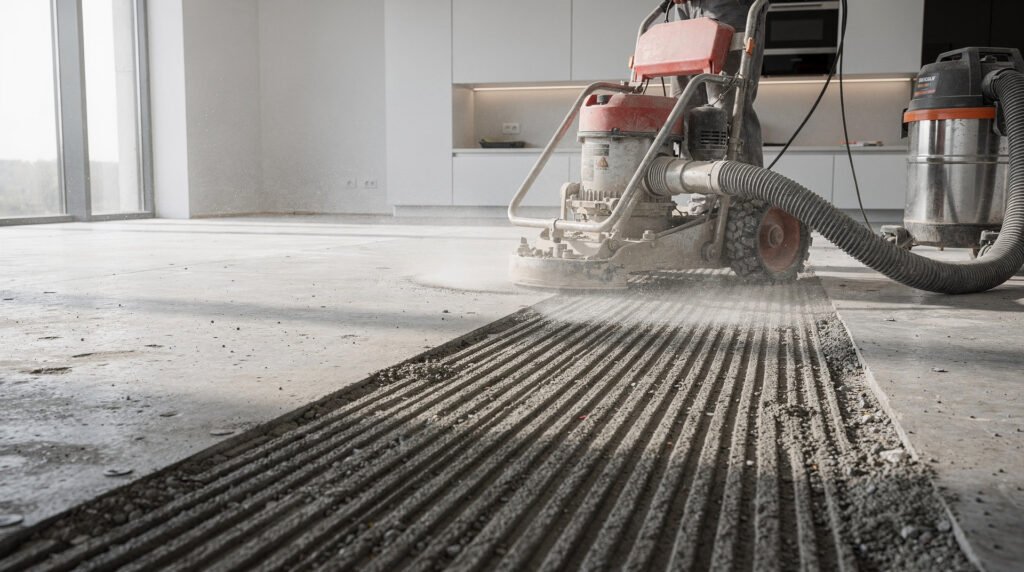
Milling involves cutting precise grooves, typically 16–20 mm wide and about 18–25 mm deep, directly into the top surface of an existing structural concrete floor using a specialized diamond-blade floor saw. The heating pipes (usually 14–16 mm multi-layer composite or PEX) are pressed into these grooves, and the grooves are then filled flush with a self-leveling compound or a flexible filler. The result is a heating system fully integrated into the slab, with no additional height build-up. The original floor level is maintained, which is critical in spaces where doors, thresholds, and staircases cannot be altered.
What is Build-Up Underfloor Heating (Opbouw)?
A build-up system leaves the concrete slab untouched and adds one or more new layers on top. A “dry” system uses pre-routed insulation panels, often cement-bonded particle board or gypsum fiber boards with integrated pipe channels, while a “wet” system pours a thin layer of screed (cementitious or anhydrite) over insulation and pipe clips. The added height typically ranges from 20 mm for ultra-low-profile dry systems to 70–100 mm for a fully insulated wet screed. Although it raises the floor level, this approach allows you to add acoustic or thermal insulation that the original slab may lack.
Milling Underfloor Heating: A Closer Look
For renovation projects where ceiling height is precious and the structural slab is sound, milling often emerges as the superior solution. Let’s break down every aspect you need to consider before choosing this method.
Installation Process and Equipment
A professional team uses an industrial floor saw connected to a high-performance vacuum system. The saw cuts multiple parallel grooves in a single pass, producing large amounts of fine concrete dust, so the vacuum is essential. After cutting, the grooves are cleaned and the pipe is laid, usually in a serpentine or double-meander pattern for even heat distribution. A specialist performs a pressure test before the grooves are filled with a flexible, polymer-modified levelling compound. Once cured, the floor takes its final covering (tiles, laminate, parquet), with an extra layer of levelling compound if required. For an average living room of 30–40 m², the process often takes 2–3 days, with the heating operational a few days later under a dry-build covering.
Structural Integrity and Minimum Slab Thickness
The most common concern is: “Will cutting grooves weaken my concrete floor?” The short answer is no, provided the slab meets minimum thickness criteria. Dutch structural engineers generally require an existing slab thickness of at least 80 mm, with groove depth not exceeding 25% of the total slab thickness. For a typical 1960s–1980s Dutch woning with a 120–150 mm concrete floor on sand, or a kanaalplaatvloer (hollow core slab), milling is safe. Always have a constructeur assess the floor first. In apartments, the VvE (Homeowners’ Association) will require proof that milling does not penetrate the compression layer of the hollow core slabs or damage the reinforcement; a professional company provides detailed documentation of cut depths and clearances.
Thermal Performance and Response Time
Because the pipes sit directly in the concrete mass, the system has very high thermal conductivity. Concrete is an excellent heat conductor and store, so the slab acts as a thermal battery. It heats up relatively slowly, typically 2–4 hours to reach a comfortable surface temperature, but once warm it retains heat for a long time, making it ideal for continuous heating with a heat pump. The low flow temperature of 30–35 °C works perfectly and achieves a high Coefficient of Performance (COP). The thermal inertia can be a drawback in rooms used intermittently, since the temperature cannot be adjusted quickly.
Cost Considerations in the Netherlands
Pricing for milling in the Dutch market ranges from €55 to €85 per square meter for the basic installation, including pipe, manifold connection, pressure testing, and filling. This does not include the heat source (heat pump), manifold itself, or final floor levelling and covering. For a 60 m² ground floor, expect to invest approximately €3,500–€5,000 for the milling alone. Key cost drivers include the number of corners (complex room shapes increase labour), the need for extra levelling compound if the slab is uneven, and temporary removal of furniture. Always request an offerte that separately lists the milling, the floor restoration, and the electrical connection for the manifold pump.
Critical Limitations
- Floor structure: Not possible on wooden floors or very thin concrete. Unsuitable for floors with embedded underfloor insulation beneath the slab, as the milled grooves could compromise the damp-proof membrane.
- Insulation retrofit: Milling alone does not improve the insulation value of the floor. If your ground floor lacks under-slab insulation (common in pre-1980 homes), you will lose significant heat downwards. In such cases, you may be required to add side-edge insulation and accept higher heat loss, or choose a build-up system with integrated insulation.
- Height gain: While no build-up is added, the final floor after levelling may be 3–5 mm higher than original, which can still affect doors if tolerances are tight.
Build-Up Underfloor Heating: The Layered Approach
When the existing floor is structurally unsuited for milling, you need insulation, or you value rapid response, a build-up system is the pragmatic choice. Here we examine both dry and wet variants in a Dutch renovation context.
Dry Construction Systems (Droogbouw)
Dry systems use prefabricated panels, 18–25 mm thick, with aluminium heat distribution plates and factory-cut pipe tracks. Brands such as Fermacell Therm25, Knauf GIFAfloor, or WTH Vloerverwarming are widely available in the Netherlands. The panels are laid directly on a levelled concrete slab with a thin PE-foil separation layer. After pipe installation, the floor can be covered immediately with laminate, parquet, or vinyl, with no drying time. Total height build-up starts at 20 mm with integrated pipe-in-panel solutions. This makes it the fastest route to a finished floor, with installation times of 1–2 days for a team.
Advantages
- No wet trades, no drying time;
- Total height increase typically 20–35 mm including final covering;
- Low weight, suitable for timber joist floors (with additional considerations) or apartments with load restrictions;
- Fast thermal response: heats up in 30–60 minutes, ideal for bedrooms or spaces heated occasionally.
Disadvantages
- Limited thermal mass: floors cool down quickly once heating stops;
- Aluminium layers can creak if the substrate is not perfectly flat;
- Higher material cost per m² than wet screed (€60–€100/m² for premium panels with aluminium);
- Poor performance with high-temperature heat sources; these systems are designed for low-temperature heating.
Wet Screed Build-Up (Natbouw)
This traditional method applies a bonded or floating screed over the concrete slab. For floating screeds, a layer of rigid insulation (PIR, EPS, or mineral wool) is laid first, then the pipes are clipped onto the insulation, and finally a cementitious or anhydrite screed of 30–70 mm thickness is poured. Total build-up: 70–120 mm. This completely transforms the floor’s thermal properties. For a ground floor, the Dutch Bouwbesluit requires an Rc value of at least 3.7 m²K/W for new-build; in renovation, you are strongly recommended to achieve ≥ 2.5 m²K/W. A 50 mm PIR insulation layer (Lambda 0.022) gives Rc ≈ 2.3, often sufficient when combined with the existing slab’s residual insulation.
Process and Drying Times
After placing the edge insulation strip and laying the insulation boards, pipes are fixed with tacker staples or attached to a studded panel. The screed is poured and must dry for at least 28 days for cementitious screed (or 7–14 days for anhydrite with forced drying protocols). This renders the space unusable during that period and delays the final floor covering. However, the massive thermal mass delivers supreme comfort and storage capacity, perfectly complementing a warmtepomp.
Cost Structure
A wet screed build-up with insulation, pipe, and screed typically costs €80–€130 per m² including materials and labour (excl. vloerafwerking). The wide range depends on insulation thickness, screed type, and accessibility. For a 60 m² floor, budget €5,000–€8,000. Dry systems are slightly more expensive in material but save on screed labour, often coming in at €90–€120 per m² for the complete underlayment ready for covering.
Direct Comparison: Milling vs Build-Up
The table below synthesizes the key decision-making parameters for a Dutch renovation. Use this as a quick guide, but always validate with your installer and the specific conditions of your project.
Criteria: Added Floor Height
Milling (Infrezen): 0–5 mm
Build-Up Dry (Droogbouw): 20–35 mm
Build-Up Wet (Natbouw): 70–120 mm
Criteria: Thermal Inertia
Milling (Infrezen): Very High (slow response, long storage)
Build-Up Dry (Droogbouw): Low (fast response, quick cooling)
Build-Up Wet (Natbouw): High (moderate response, good storage)
Criteria: Ideal Heat Source
Milling (Infrezen): Heat pump (continuous low temp)
Build-Up Dry (Droogbouw): Heat pump (modulating, low temp)
Build-Up Wet (Natbouw): Heat pump or HR-ketel (any low temp)
Criteria: Insulation Upgrade
Milling (Infrezen): None (relies on existing under-slab)
Build-Up Dry (Droogbouw): Possible if special insulated panels used
Build-Up Wet (Natbouw): Integral and essential
Criteria: Structural Load
Milling (Infrezen): No added dead load
Build-Up Dry (Droogbouw): Low: 10–15 kg/m²
Build-Up Wet (Natbouw): High: 80–150 kg/m² depending on screed and insulation
Criteria: Installation Speed
Milling (Infrezen): 2–4 days (plus floor prep)
Build-Up Dry (Droogbouw): 1–2 days (immediate covering)
Build-Up Wet (Natbouw): 5–8 days (plus 4-week drying)
Criteria: Floor Suitability
Milling (Infrezen): Only solid concrete ≥80 mm thickness
Build-Up Dry (Droogbouw): Concrete, timber joists (with caution), existing tiles
Build-Up Wet (Natbouw): Concrete (with load assessment)
Criteria: Typical Cost (per m² installed)
Milling (Infrezen): €55–€85
Build-Up Dry (Droogbouw): €90–€120
Build-Up Wet (Natbouw): €80–€130
Criteria: Suitable for VvE (Apartment)
Milling (Infrezen): Often allowed with structural report
Build-Up Dry (Droogbouw): Usually allowed (low impact)
Build-Up Wet (Natbouw): Rarely allowed due to weight and height
Dutch Building Regulations and Practical Considerations
When renovating, you must be aware of the following points that specifically affect Dutch homes:
Insulation Requirements (Bouwbesluit)
If you replace or renovate more than 25% of a floor, the minimum Rc-value for that floor must be brought up to modern standards (currently Rc ≥ 3.7 m²K/W). However, the “renovation exception” allows a lower value of 2.5 m²K/W when full compliance is technically unfeasible. When milling, you are not replacing the floor, merely modifying it; thus the insulation requirement often does not apply. But if you choose a build-up system with a new screed, the municipality may consider it a thermal renovation, triggering the insulation obligation. Always check with your gemeente or a building inspector before starting.
Door Thresholds and Ceiling Height
Dutch homes, particularly apartments in cities like Amsterdam or Utrecht, often have ceiling heights of 2.50 m or less. The Bouwbesluit does not prescribe a minimum ceiling height for existing buildings, but removing 10 cm for a wet build-up can make a room feel oppressive and violates practical comfort norms. In such cases, milling is the only way to preserve headroom. Measure your existing door thresholds; they are typically 20–30 mm. A dry build-up of 25 mm will eat that entirely, requiring all doors to be trimmed, which adds €50–€80 per door to your budget.
VvE Approval for Apartments
In an apartment complex, the concrete floor is often shared structural property. Milling requires explicit written consent from the VvE and usually a structural engineer’s report. The argument you must make is that the grooves are well within the top cover layer and do not compromise the floor’s load capacity. A dry build-up often raises fewer objections because it adds minimal weight and can be removed without damaging the structure. Always present your plan with technical drawings and an installer’s declaration.
Practical Tips for a Successful Retrofit
- Commission a structural assessment first. Hire an independent engineer to measure slab thickness, locate reinforcement, and test concrete quality. This €300–€500 investment can save you from costly damage or VvE disputes.
- Verify floor flatness. For milling, the slab must be reasonably level (within 5 mm over 2 meters). For dry build-up, the substrate flatness tolerance is even tighter (±2 mm) to prevent panel movement and noise. Budget for a self-leveling underlayment if needed.
- Do not ignore under-slab insulation. If your ground floor has no insulation, milling alone will result in 15–25% downward heat loss. Mitigate by adding high-performance edge insulation at the floor perimeter (at least 100 mm width) and accepting a slightly higher flow temperature. Better yet, consider a build-up with integrated insulation if height allows.
- Plan the manifold location carefully. Both systems need a manifold, preferably centrally located to minimize pipe runs and pressure loss. In a milling project, the manifold can be wall-recessed; in a build-up, it may be placed in a new technical cabinet. Ensure a dedicated 230V power supply within 1 meter.
- Choose your floor covering with heat resistance in mind. The total thermal resistance of the floor covering should not exceed 0.15 m²K/W for optimal performance. Avoid thick carpets with high tog ratings. Use a suitable underlay for parquet or laminate specifically designed for underfloor heating.
- Pressure test before covering. Whether milled or built-up, insist on a 24-hour pressure test at double the operating pressure before any filler, screed, or panels are placed. Document the results for your peace of mind.
- Engage a BENG-aware installer. With the shift to nearly zero-energy standards (BENG), your heating system must work at 35 °C or below. An installer experienced in low-temperature design will calculate the exact pipe spacing (10–15 cm for milling, 10–15 cm for build-up), flow rates, and manifold balancing to ensure your heat pump achieves a SCOP above 4.0.
Conclusion: Which Method Should You Choose?
The choice between milling and building up does not have a universal answer; it is a function of your home’s physics, your renovation boundaries, and your long-term energy plan. Summarizing:
- Choose milling (infrezen) when you have a sufficiently thick, structurally sound concrete floor, no height to lose (low ceilings, many doors), and your ground floor already has adequate under-slab insulation. This method preserves your existing thresholds and is usually the more cost-effective option when structural conditions allow. It integrates well with a warmtepomp and delivers stable heating.
- Choose a dry build-up if you need a lightweight solution, your floor cannot be milled, you require a fast installation without drying times, or you need a responsive heating system for intermittent-use rooms. It is the method of choice for apartments where weight constraints are critical, and it can be executed with minimal disruption.
- Choose a wet build-up with screed when you must correct floor insulation levels significantly, you accept the longer construction time, and you have the ceiling height to sacrifice. The massive thermal storage is excellent for night-setback strategies with a heat pump, and it provides the most comfortable, even heat distribution over the long term.
Whichever path you select, never compromise on the quality of the pipe and manifold, engage a certified installer (preferably a member of the Vloerverwarming en Koeling branchevereniging), and ensure the design is hydraulicly balanced. A well-executed system will not only warm your feet but will turn your concrete floor into a silent, invisible, and highly efficient heater, aligning perfectly with the Netherlands’ sustainable future.